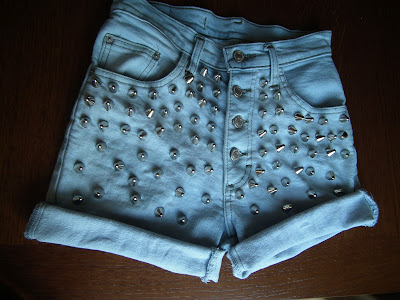
I made these shorts a while ago out of an old pair of jeans. I didn't like the bottom of them so I decided to fray them. I did do a post on how I bleached and studded them, but I'll repost that here too so you have the full tutorial.
This is great idea if you want to revive an old pair of unused jeans!
:D
This is great idea if you want to revive an old pair of unused jeans!
:D
Bleaching
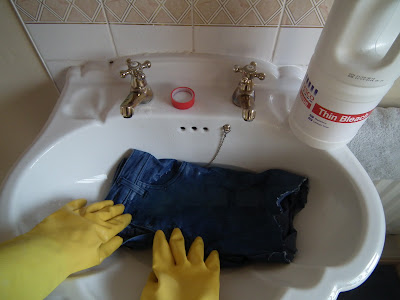
As you can see, my jeans were quite a dark colour so I went about bleaching them. I'm not sure what was wrong with this denim, but it WOULD NOT BLEACH!
I used a mixture of thick bleach and water, I left them to soak for over 6 hours and they didn't change colour at all...
I had to get more bleach and I found Tesco's own brand thin bleach, £0.29 for a 2 litler bottle so got that!
I used the bleach neat and left it on my shorts and it finally started working...
I still had to wait a long time for them to bleach, about another 6 hours but it was worth the wait...
As you can see, they are significantly lighter than what they were...
Studding
All I needed to do then was to stud them! Luckily for me ,I already had some leftover studs from previous projects so I didn't have to spend any money on them :D
FRAYING
The first thing you need to do cut them, (you couldn't see the cut lines I had drawn on so I edited them on so you understand what I mean lol)
The red line is where you should cut, and the green line is where you should start fraying them. The gap in the middle is how long your frayed edges will be, so make it as long / short as you like. I would say make it bigger as if you want the frayed edges to be shorter, you can always trim them later.
I used a 'Quick Unpick' to fray them. It took forever and made a right mess haha
I frayed them all the way around, then they were done!
TOP TIP
If you accidently cut your shorts too short, accidently cut off some of the frayed edges or simply want the frayed edged thickening up, you can do this...
Take a spare piece of denim that you've just cut off and fray the edge of it...
Turn your shorts inside out then glue the fabric onto the inside. It's a better idea to use glue as if you sew it on, you will see the stiches on the outside.
All you need to do now is trim the edges to blend the two layers together and there you go, one pair of bleached, studded, frayed denim shorts!
:D
If you have a go at this and do a blog post on it, leave me the link in a comment below as I'd love to check it out!
:)
:)
Shorts:
Old pair of jeans: Mum's wardrobe - £0.00 :D
Bleach - Tesco's own brand thin bleach @ £0.29 for 2L
Rubber gloves
Scissors
Quick Unpick
Fabric glue
Studs - 1/2 inch tall cone studs, pack of 100 @ £10.95, find here
Sammi, x


Very impressed with these!
ReplyDeletexXx
Follow me too? Oh So Gawjess
coach outlet online
ReplyDeletemichael kors outlet
herve leger outlet
coach outlet online
michael kors
ray ban sunglasses outlet
cheap oakley sunglasses
hermes belt
cheap oakley sunglasses
cheap jordans for sale
20170211lck
lebron shoes
ReplyDeletecoach outlet online
michael kors bags
coach factory outlet
fred perry shirts
air jordans
longchamp bags
christian louboutin outlet
coach outlet store online clearance
nfl jerseys wholesale
20170321yueqin
michael kors outlet
ReplyDeleteburberry canada
Nike Free shoes
ralph lauren
air force 1 shoes
true religion outlet uk
louis vuitton
nba jerseys wholesale
nike air max
michael kors outlet online
20170517ck
huarache shoes
ReplyDeletenike react
nike basketball shoes
michael kors outlet online
golden goose superstar
jordan 1 off white
nike shox for women
nike air max 2018
yeezy boost 350 v2
true religion outlet